Magento module that its directory containing blocks, controllers, models, helpers that are related to business features. Every module can work pretty much standalone unit or with minimal dependencies with other modules.
If we need to integrate extra features, a part of Magento default features, then we can make custom functionalities. We can override the default Magento features as per our requirements.
For this module we will create a 4 parts.
PART 1 – We are right now in part 1(How to Build a Complete Module Part 1)
PART 2 -How to Create Custom Module URL and Display Content in Mage
PART 3 -How to Create and Insert Data in Custom Database Table in Magento 2?
PART 4 –Display Data From Database On Frontend in Magento2
Let’s start Part 1 from here
Here we are going to implement these steps:
Step 1: Install Magento 2 in your system.
Step 2: Create Magento 2 Module Structure
Step 3: Declaration of Module
Step 4: Registration of Module
Step 5: Activate the Module
Step 6: Add functionality–Display module link in the footer
Step 7: Enable/Disable Module depending on the admin setting`
Let’s create a Module by following the below steps:-
Step 1: Install Magento 2 in your system.
You can read about How to install Magento 2 in your machine.
https://therealprogrammer.com/how-to-install-in-magento-2-in-macbook/Step 2: Create Magento 2 Module Structure
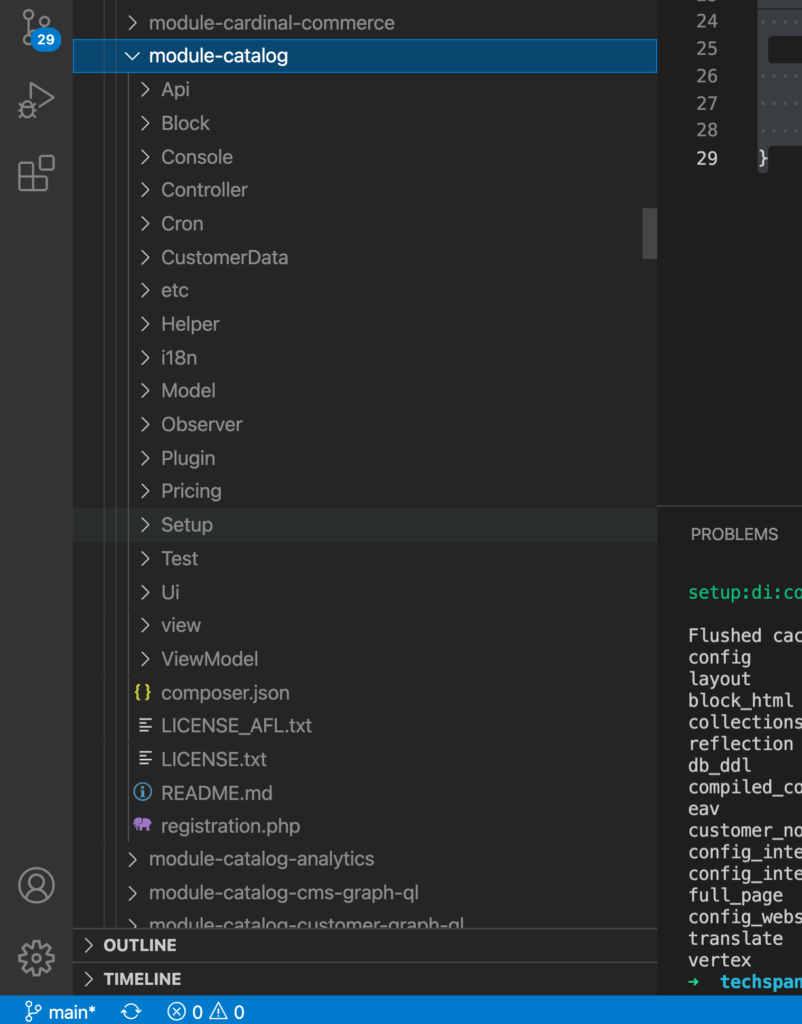
In Magento module can be located 2 places. First place 3rd party modules that can be Magento 2 core modules are located under vendor/Magento. We can find the second module in the app/code directory. This module we’ll use for custom modules.
The above is a standard module folder structure. This is the folder structure of the Magento catalog module.
After installation we had to put our code inside of htdocs folder.
/Application/MAMP/thdocs/magento2
- app/code/Realprogrammer
- app/code/Realprogrammer/Mymodule
In the Real programmer folder we going to create code folder inside app folder
/app/code the structure will be app created app/code/Realprogrammer/Mymodule/
Create first file inside of this folder composer.json
Contents would be:
{
  "name": "realprogrammer/mymodule",
  "description": "Magento 2 new module",
  "type": "magento2-module",
  "version": "4.0.3",
  "license": "proprietary",
  "authors": [
    {
      "name": "Realprogrammer",
      "email": "[email protected]",
      "homepage": "https://therealprogrammer.com",
      "role": "Technical Support"
    }
  ],
  "autoload": {
    "files": [
      "registration.php"
    ],
  }
}
Composer will load this file every time you run it.
Step 3: Declaration of Module
Here we will create etc folder and we will put module.xml inside of this folder.
app/code/Realprogrammer/Mymodule/etc/module.xml
Contents would be:
<?xml version="1.0"?>
<config xmlns:xsi="http://www.w3.org/2001/XMLSchema-instance" xsi:noNamespaceSchemaLocation="urn:magento:framework:Module/etc/module.xsd">
<module name="Realprogrammer_Mymodule" >
     <sequence>
         <module name="Magento_Directory"/>
         <module name="Magento_Config"/>
     </sequence>
 </module>
</config>
Step 3: Registration of Module
To register the module, create a registration.php file in the app/code/Realprogrammer/Mymodule/registration.php
Contents would be:
<?php
\Magento\Framework\Component\ComponentRegistrar::register(
	\Magento\Framework\Component\ComponentRegistrar::MODULE,
	'Realprogrammer_Mymodule',
	__DIR__
);
Step 4: Activate the Module
We will enable our module first we will check module is enable or not
php bin/magento module:statusYou should see the module is disabled now:
List of disabled modules: Realprogrammer_Mymodule
So lets run the command to enable our module:
php bin/magento module:enable Realprogrammer_Mymodule
Now that you have enabled the module first time, so you have to upgrade the database of the module by using this command line:
php bin/magento setup:upgrade
After successfully enabling the module, recheck the status of modules with the command line that was mentioned before.
Step 5: Add functionality–Display module link in the footer
Now we will display our module link MyModule in the footer area.

For this, create default.xml file in path app\code\Realprogrammer\Mymodule\view\frontend\layout\default.xml
and add below code in it:-
<?xml version="1.0"?>
<page xmlns:xsi="http://www.w3.org/2001/XMLSchema-instance" xsi:noNamespaceSchemaLocation="urn:magento:framework:View/Layout/etc/page_configuration.xsd">
    <body>
       <referenceBlock name="footer_links">
            <block class="Magento\Framework\View\Element\Html\Link\Current"  name="mymodule-link">
            <arguments>
                 <argument name="label" xsi:type="string" translate="true">My Module</argument>
                 <argument name="path" xsi:type="string">mymodule</argument>
            </arguments>
        </block>
      </referenceBlock>
    </body>
</page>
and save the file. and check in the site, it will show our module link in the footer.
Step 6: Enable/Disable Module depending on the admin setting
It’s time to add the functionality of enabling and disabling our custom module from admin so that anyone who has admin access can do it. To do so, create system.xmlfile in app/code/Realprogrammer/Mymodule/etc/adminhtml path
Content would be:-
<?xml version="1.0"?>
<config xmlns:xsi="http://www.w3.org/2001/XMLSchema-instance" xsi:noNamespaceSchemaLocation="urn:magento:module:Magento_Config:etc/system_file.xsd">
<system>
<tab id="realprogrammer" translate="label" sortOrder="200">
<label>Realprogrammer</label>
</tab>
<section id="realprogrammer" translate="label" sortOrder="150" showInDefault="1" showInWebsite="1" showInStore="1">
<class>separator-top</class>
<label>Mymodule</label>
<tab>realprogrammer</tab>
<resource>Realprogrammer_Mymodule::configuration</resource>
<group id="general" translate="label" type="text" sortOrder="10" showInDefault="1" showInWebsite="0" showInStore="0">
<label>General Configuration</label>
<field id="enable" translate="label" type="select" sortOrder="1" showInDefault="1" showInWebsite="0" showInStore="0">
<label>Enable Module</label>
<source_model>Magento\Config\Model\Config\Source\Yesno</source_model>
</field>
</group>
</section>
</system>
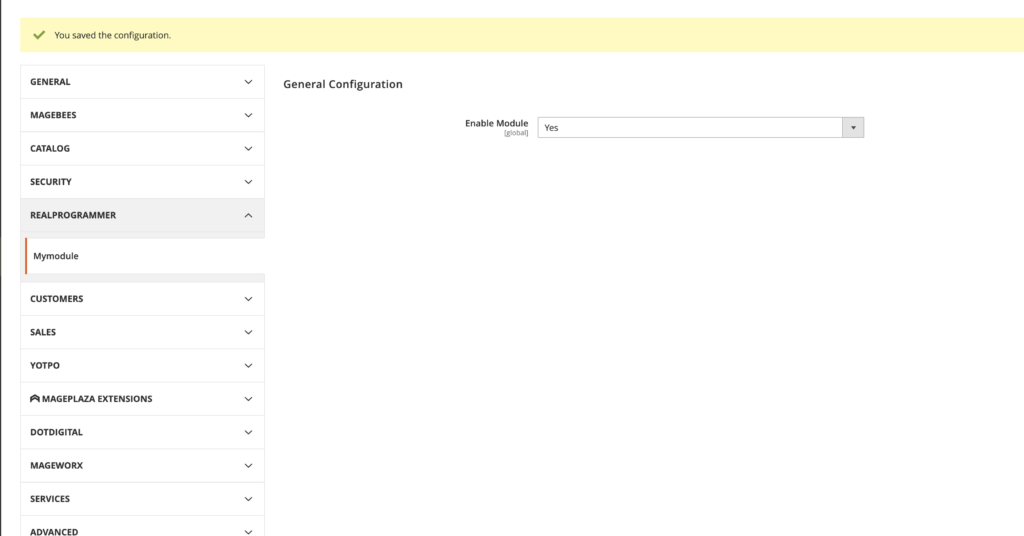
</config>After adding this code, Flush the Cache. Then Go to admin panel->Stores->Configuration and check our module configuration.
Lets update “ifconfig=”section_id/group_id/field_id”” line in the block of the reference “footer_links” in file app\code\Realprogrammer\Mymodule\view\frontend\layout\default.xmllike this
<block class="Magento\Framework\View\Element\Html\Link\Current" ifconfig="realprogrammer/general/enable" name="mymodule-link"> What if we want to automatically enable this module when we will install this module, to do so create config.xml file in path app\code\Realprogrammer\Mymodule\etc.
And content would be :-
<?xml version="1.0"?>
<config xmlns:xsi="http://www.w3.org/2001/XMLSchema-instance" xsi:noNamespaceSchemaLocation="urn:magento:module:Magento_Store:etc/config.xsd">
     <default>
        <realprogrammer>
           <general>
                <enable>1</enable>
           </general>
         </realprogrammer>
     </default>
</config>
You can put the path to the field in the <default> element to set value default for it. The format is:
<default>
    <section_id>
        <group_id>
            <field_id>{value}</field_id>
        </group_id>
    </section_id>
</default>
Thats All.


